Difference between revisions of "Battery Management System"
From Unofficial Zero Manual
BrianTRice (talk | contribs) (re-attach orphaned illustration) |
(No difference)
|
Latest revision as of 16:47, 5 June 2020
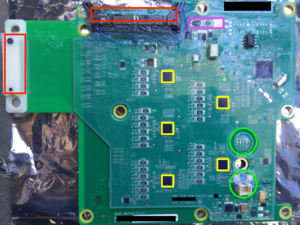
Zero's Battery Management System (BMS) consists of a proprietary board within the battery case to manage the cells.
The same board model seems to be capable and used for both single-brick (XMX Platform) bikes and power pack (SDS Platform) bikes, given software configuration changes. The board appears to be OEM-designed and has revision numbers that indicate progression over time from the 2013 model line.
- Power Note
- This is the one power drain on the vehicle when it is completely turned off with no charging, but it draws a very minor amount of power like a "sleep" mode.
The board is entirely solid state and not designed for fixing, only replacement.
|
The board has full battery voltage inputs to it at all times.
|
- Location (SDS Platform / Monolith)
- Behind the lower front face of the battery behind the front forks/wheel.
- Remove the lower front body plastics and the front battery face to access the unit.
- Location (XMX Platform / Power Tank)
- Each separate brick has its own BMS inside the armored casing.
- The long brick has one BMS module inside the armored casing.
- Revisions
- The BMS has changed layout over the years to match the monolith (particularly for long brick architecture) and increased in physical robustness and protections.
- TODO identify those revisions and describe them.
- Protections
- The board is mounted with rubber vibration dampening.
- The board is layered with a very thick coating ("dam and fill potting") to protect the components from moisture and shock damage.
- The rubber pads covering reset buttons and LED indicator lights (for 2015+ models) have dielectric grease coating (CP70 datasheet) those components.
- The covers are not there to make it waterproof, only to keep the dirt out of the grease.
- MY13 bikes had no grease. MY14 bikes had a different grease that did not age well, and CP70 is worth applying to both MY13 and MY14.
- Maintain that coating and do not pressure wash the front of the battery casing to avoid damaging this board.
- Inspecting
- If the BMS stops working (no indication from the lights, no response to reset), the appropriate, non-warrantee-risking thing to do is take it to a dealer and they'll likely replace it under warrantee.
- But if a dealer visit is difficult or there's an emergency, a visual inspection might inform what's going on (naturally, a bike that doesn't work feels like an emergency; use your judgement).
- Basically, uncover the BMS and look for burned out components.
- There is a large pin connector which may be loose, which would explain a loss of power to the BMS. Apparently this is very difficult to work with but can be re-attached carefully.
- Don't loosen the BMS mounting without a very good reason - it's always connected to battery cell voltage by some pins on the side that run into the batter pack so a spark there might be damaging.
- If you are going to lift off the BMS, take extreme care with the fasteners and dampeners to not drop them into the battery casing.
- You'll also need to restore each and every fastener and dampener because the BMS mount prevents vibration damage.
- Diagnostics
- The mobile app can extract BMS logs, but it is a very slow and error-prone process compared to MBB log extraction.
- The front of the board has a diagnostic port for a live debugging connection.
- A cable to access the serial connection of the diagnostic port is described here
- BMS Articles
