SDS Platform/Headlamp
From Unofficial Zero Manual
- Pre-2012
- Hella circular reflector unit (possibly the Vision Plus 5¾" conversion headlamp).
- 2012+
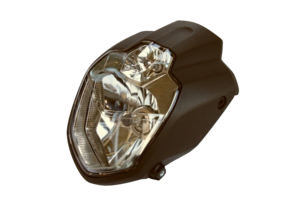
- For 2012+ models, the Zero's stock headlamp assembly is the LSL Urban Headlight with an H4 bulb in a 9003 / HB2 socket, and a W3W stock running light.
- LSL Urban headlight housing dimensions: 190mm width, 260mm height, 125mm depth.
- The headlamp housing OEM is by TRIOM with part number T7869010. It can be bought on the Italian market (ebay.it or amazon.it or such) for $100 instead of $160 in the US.
- Power
- The stock headlamp draws about 55/60W which is the largest regular 12V electrical load by default.
- The electrical load doesn't impact range much (110Wh over 2 hours compared to 11+kWh yields 1% range difference), unless you ride a very slow long travel leg for, say, offroading.
- However, it does heat up the housing glass.
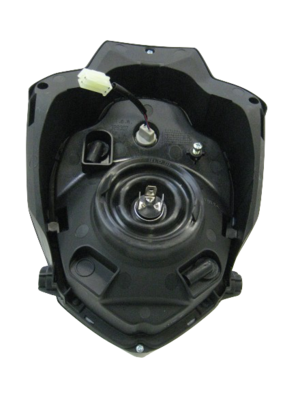
- Bulb Retainer
- The headlight is fastened in by a plastic bracket that locks when rotated, and covered with a rubber boot to protect from moisture.
- Tools
- 3mm (H3) Allen key
- 4mm (H4) Allen key
- Steps
- Unbolt the two lower mount screws with a 4mm Allen key.
- Unbolt the two upper mount screws with a 3mm Allen key.
- Disconnect the headlight and running light wires to detach the assembly completely.
- Video guide
- Steps
- Suggestion: Unbolt the headlamp assembly (with 3mm and 4mm allen wrenches) from the metal brackets to get enough room to work.
- ...unless you have very small hands and move the existing cabling out of the way.
- Detach the existing bulb's cable at the plug.
- Pull the rubber cover away from the headlamp.
- Twist the retaining bracket to release the bulb.
- NOTE: Avoid touching the bulb; oil and dirt from your fingers can cause the bulb's surface to heat up while operating and could age the bulb prematurely. Keep the bulb clean.
- Place the retaining bracket and rubber cover around the new bulb and press and rotate to fix it in place.
- NOTE: For a 2013-2014 model, the plastic retaining bracket might require some filing to fit another bulb with its assembly to hold it in and lock properly. Later models have an easier shape to fit.
- Calibration
- When replacing the headlamp, check the light pattern emitted and adjust the set screw in the headlamp housing to get a suitable projection angle.
This replaces the W3W running light bulb on the SDS Platform Headlamp.
- Steps
- Remove the headlamp
- Turn and/or wiggle the rubbery boot at the rear of the running light to extract it from the headlamp assembly.
- Optionally, unplug the running light wiring connector first, if it makes it easier to manipulate.
- Remove the bulb and insert its replacement.
- As with any bulb, take care not to leave skin oil or other residue on the bulb's surface, which could thermally stress it over time.
- Re-insert the running light by its rubbery boot into the headlamp assembly.
- Re-connect the running light wiring connector if appropriate.
- Re-install the headlamp.
- Adjusting angle (2013+)
- There is a set screw on the upper-right rear face of the headlamp housing to adjust the angle of illumination.
- Adjust this while the bike is sitting fully upright.
- Remove the lower screws and swing the headlamp on the two upper bolts to access the screw while adjusting.
- Turn the set screw clockwise to aim the headlamp down, counterclockwise to aim it up.