SDS Platform/Zero Drop Bars/Install
From Unofficial Zero Manual
The police models (SP/DSP) include some drop bars with bracketing to mount law enforcement specific equipment like a siren and flashing lights.
- Both the police versions of these drop bars and less expensive drop bars without the bracketing are available to all owners.
- The width is broad; about 7 inches on the top half (for a total 26" width around the frame there), but they taper to the bottom so lean angle is not affected.
- Zero does not list all drop bar options on their website, but dealers can request them by part number.
- Instructions have not been observed included yet.


- Construction
- Steel tube of 1" outer diameter with a black finish.
- Upper Fastening
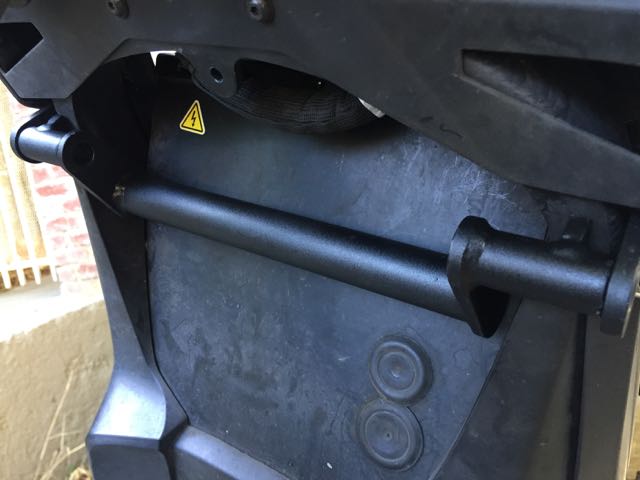
- The bars attach to each other via a crosspiece just in front of the frame.
- The crosspiece is held to the frame by shoulder brackets on each side.
- Lower Fastening
- The bars have a flange that bolts directly to collared inserts in the metal skid plate.
- The metal skid plate is provided on the DS/DSR.
- The plastic skid plate provided on the S/SR is swapped for the DS/DSR metal skid plate during installation.
| Part Number | Name | Price | Notes |
|---|---|---|---|
Police Drop Bars
|
$450 | ||
| 10-08062XX | Dual Sport Drop Bars | $250 | 
|
10-0806203
|
Frame Protection Bar Accessories Kit, Non-Police, 13-16 MY
|

| |
| 10-08028 | Zero FX Drop Bars | $175 |

- Install Variations
- 2015+: the frame is predrilled to mount them, but the lower mount varies slightly per model year and may require modification to the belly pan.
- 2014: the belly pan required drilling, and use of Rivnuts. Zero was not cooperative in acquiring, but parts from a downconverted SP were found.
- 2015+ DS,DSR: The skidplate included in the 10-08062XX kit is redundant.
- It is the exact same one already on a factory new DSR, with plastic plugs in the threaded inserts that need removed.
- Parts


- (2) Side bars (left and right).
- (1) Crossmember piece.
- (1) Metal skid plate; identical to DS/DSR original skid plate, and must replace an S/SR plastic skid plate.
- (2) Shoulder brackets (left and right).
- (2) Heavy hex head M10x70mm stay bolts - 30mm thread with 40mm shoulder. Stamped "FMI 10.9" on the head.
- These join the crossmember to the bars through the shoulder brackets.
- (4) Shoulder mount bolts: M5x20mm cap head bolts (replacements can have a 5mm long shoulder that is 6mm diameter).
- (5) Wide washers: 6mm ID, 14mm OD
- (4) Narrow washers: 6.5mm ID, 12mm OD
- (2) Toothed lock washers: 5mm ID
- These may be mistakenly included when recorded? No known application
- (4) Lower mount bolts: M6?x15mm hex head bolts.
- Tools
-


- Allen wrenches for M5 and M6 bolts (depends on what is chosen).
- 10mm hex socket wrench for the stay bolts.
- Optional: Plastic rivet removal tool
-

- Steps
- Pre-2015: Create frame holes for the upper and lower pair of bolts on each side of the frame.
- Installing rivet nuts as Zero started doing for 2015+ frames is a good practice.
- Zero chose M5 rivet nuts with a 5mm deep, 6mm diameter shoulder space above it. M6 might be a more robust choice.
- One pair goes into the rear/top of the angled bar before it comes to the frame shoulder, 30mm between hole centers.
- One pair goes into the side of the belly pan / bash plate. The DS' metal bash plate is more suitable for this.
- S/SR: Remove the original plastic skid plate and install the included metal skid plate.
-
- Remove the plastic threaded cover inserts in the pair of holes on each side of the bash plate.
- You may need to remove the plate to rotate them out from the inside. Remount after.
- Detach the horn bracket (via a hex nut and lock nut) and set it aside.
- You may relocate it closer into the front of the frame or move it to the side (no recommendation here).
- DS/DSR: The front fender will interfere with this and the next step. Detach it and set it aside.
- Install the small shoulder brackets on each side of the frame shoulder area, using the pair of holes to anchor the brackets.
- Each side will have a pair of collared holes in the frame arms near the front of the tank plastics.
- Slide the brackets in from below and behind.
- The holes for the bars will be in front of the frame arms on the outside.
- Do not tighten the bolts until all pieces are in place.
-

- Take the cross member and place it between shoulder brackets.
- It has a flat edge which should rest against the front of the diagonal frame bars.
- The bar will be very close to the plastics covering the front of the battery, and recessed upward.
- The shoulder brackets might be under tension once the bar is in between the brackets. This is normal.

- Hold the cross member in place by running the M10x70mm bolts through the main holes.
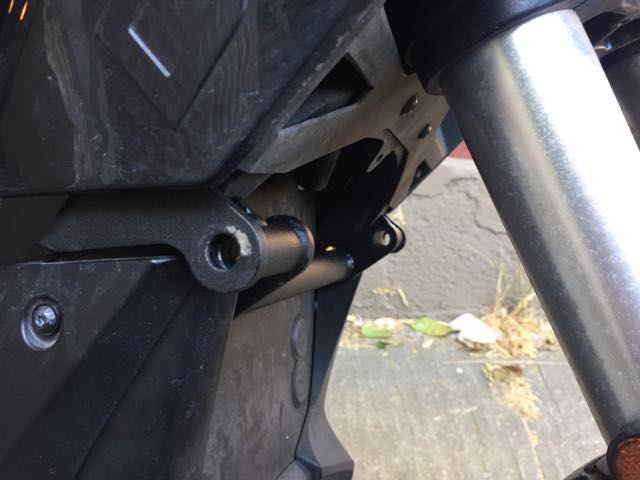
- Attach each drop bar:
- Place the bar against the shoulder bracket with the lower end hanging back but under the bike.
- Thread the M10 bolt through the shoulder bracket into the bar's top opening to support the bar.
- Rotate the supported bar's bottom end to cover the skid plate.
- Thread M6 bolts through the lower end's flange into the collared holes on the side of the skid plate.
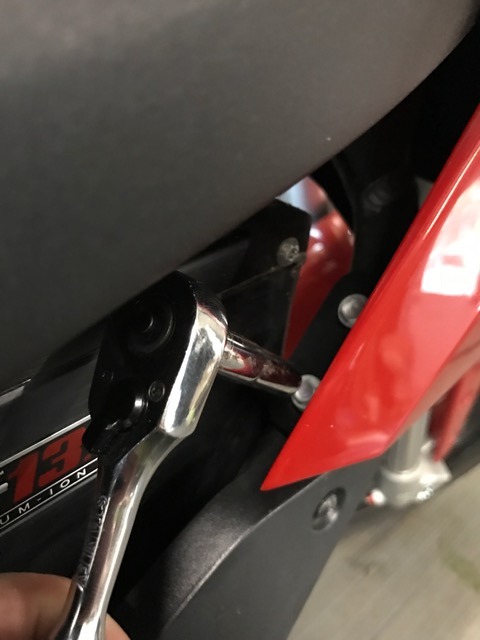
- Tighten the bolts (M10 at top and M6 at bottom) in concert.
- The M10 bolt at top could benefit from either a telescoping socket across the bike behind the forks, or a shallow side socket wrench.
- The M6 bolts below can use a hex socket with an extension.
- Re-mount the horn by either:
- Re-attaching the horn bracket:
-
- Attaching the horn to the left bar bracket:
-
- Re-attaching the horn bracket:
- Once both crash guard bars are fastened tightly, check and tighten the bolts holding the small shoulder brackets.
- DS/DSR: replace the front fender if you removed it before.


- References