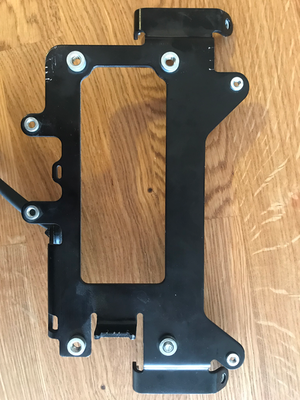
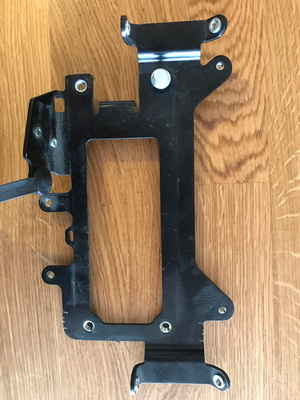
SDS Platform/Board Mounting Plate
From Unofficial Zero Manual
A vertical plate aft of the battery supports both the Main Bike Board and the DC-DC 12V Converter.
The plate varies between pre-2015 model years and the following model years, likely because of the DC converter upgrade in 2015 from 300W to 500W to support ABS braking equipment power requirements.
- Attachments
- The Main Bike Board is mounted to the rear face of the plate for 2013-2014 models, and to the rear face of the upper edge of the plate on 2015+ models.
- The DC-DC 12V Converter is mounted to the forward face of the plate for 2013-2014 models, and to the lower rear face of the plate on 2015+ models.
- The Accessory Charging Port is screwed to a flange at the bottom of the plate via two small M2.5 allen key bolts.
- The rubber boot covering the Accessory Charging Port is attached to the flange via plastic push-rivet.
- One cable run is zip-tied to a slot in the lower left corner of the plate, accessible under the frame arms forward of the onboard charging plug.
- Another cable run is zip-tied a slot in the lower edge of the plate closer to the right side, accessible under the frame arms behind the battery.
- Mounting
- The bracket has side flanges that affix the plate to the left and right sides of the frame.
- The top two corners of the flanges bend to the rear of the bike at a 45 degree angle, which mate to similarly-positioned flanges on the frame sides. The frame side flanges are above the plate flanges, which means when installing and removing the plate, the top must be angled towards the rear of the bike.
- The bottom two corners of the flanges bend to the rear of the bike at a 90 degree angle. The bolts which affix these corners point upwards (cap head points down).
- Fasteners
- 4x M4 socket cap bolts, 12mm length, 0.75mm? depth, 5mm outer diameter, with washers.
- 2x M2.5 socket cap bolts, 25mm length with a 6mm shoulder, 0.5mm? depth, 2.5mm outer diameter, with washers.
- 2x M3 socket cap bolts, 10mm length, 0.75mm? depth, 4mm outer diameter, with washers.
- Tools
- 2.5mm, 3mm, 4mm Allen keys.
- Low clearance (under 20mm) 3mm Allen key.
- Steps
- Remove the seat.
- Remove the underseat Y-shaped frame piece.
- Detach the MBB by removing the two bolts holding it to the plate with a low-clearance 3mm Allen key.
- The right side bolt will be extremely difficult to manipulate given the cables routed very close to it; consider displacing them.
- Push the MBB aside to the left without unplugging its connectors.
- Remove the two bolts attaching the upper left and right corners, facing 45 degrees up/forward, with a 2.5mm(?) Allen key.
- Remove the two bolts attaching the lower left and right corners.
- Reach them from below the frame arms on each side of the bike, just forward of the stanchions.
- Use a 2.5mm(?) Allen key (preferably a ratcheting socket).
- Snip the cable run zip tie on the lower left corner of the plate.
- Snip the cable run zip tie on the lower edge of the plate from the right side.
- A long, narrow-bladed screwdriver can be suitable.
- Detach the Accessory Charging Port from the lower flange of the plate using a 2.5mm(?) Allen key on the two narrow bolts through the plug's body holes.
- Along the lower rear-facing edge bracket flange, push the cross-frame cable run off of the bracket.
-
- Pull the top edge of the plate to the rear of the bike so that the top mounting flange's corners clear the mating flanges on the frame.
- Gently pull the plate by the DC-DC converter up and aft, minding any cabling that can get snagged on the plate to avoid straining any wires.
- It seems easiest to pull the left side of the plate up first, to avoid clearance issues around the hydraulic lines running along the right side towards the rear brake system.
- Installation
- (Still working on this; essentially reversing the removal but considering the various fitment dependencies ahead of time to avoid trouble).


