Aftermarket/Fairings
Zero seems reluctant to commit to an OEM fairing design, for probably mostly business, branding, and budget reasons.
- However, a well designed conventional front fairing should increase range at highway speeds by 30%.
- A front fairing with a carefully crafted rear tail could do more, up to 50% (oversimplifying how this works here).
Contents
Full Fairings
Hollywood Electrics Fairing
Hollywood Electrics has created a custom sport-touring fairing adapted from their racing bikes.
- Features
- Full cockpit.
- Sets the headlamp forward by 4".
- Sets the dash / instrument cluster forward by 4".
- Bracketing organizes 12V wiring behind the headlamp.
- Fairing protects the dash / instrument cluster from weathering.
- Installs setback risers to help the handlebars clear the fairing.
- Allows using flush or non-stock turn signals on the fairing chin.
- Allows using fairing-mounted mirrors on the upper edge of the fairing around the windscreen.
- Windcreen
- Uses Zero Gravity windscreens for the Yamaha YZF R1, years 2015-2018.
- The windscreen being set forward by 4" makes it more effective than bar-mounted windscreens.
- Airflow
- Airflow is managed very well, only a soft updraft occurs from the underside.
- No turbulance induced on the upper edge with any tested windscreen.
- At least 10% range improvement over stock; possibly 15% depending on rider and tuning.
- Creates a larger space for tucking while riding, minimizing the effects of a rough headwind.
- Pricing
- Price is $1295, or $1495 with a paint scheme matching the 2018 SR model.
- References
- Red/white/blue Hollywood Electrics racing bike with an early fairing model
- 3 red/white/blue Hollywood Electrics racing bikes with early fairing models
- Terry Hershner's faired Zero (with Husky)
- Metallic Ocean Blue Zero SR with the fairing
- Zero DSR with the fairing in glossy grey
- 3 Zeros (DSR and SR) in a combined short
- Fitting a Hollywood Electrics Fairing by Justin Andrews shows an installation!
See the Zero customizers page for some faired Zero offerings by Hollywood Electrics and others.
Cosmetic Bodywork
OEM
- The Power Tank and Charge Tank have tank plastic options which can be bought separately or selected for color customization.
- Both use a relatively flat surface for the centerpiece, and the Charge Tank has a J1772-sized inlet hold with built in waterproof cover with a spring-loaded hinge.
- As of 2017, the Charge Tank centerpiece is separately available as part number 24-08137 for $40, to turn your existing tank plastics into a J1772-inlet-using tank.


Hollywood Electrics devised some carbon fiber body pieces:
- Carbon Fiber Locking Tank Cover
- Carbon Fiber Seat Cowl
- Carbon Fiber Front Fender for S, SR, and FXS models.
OEM Fly Screen
The OEM Fly Screen provides 2013 Zero models with a small but reasonably good-looking hard plastic shroud around the Koso instrument cluster above the headlamp.
- Presumably this has a marginal effect on drag and energy consumption, but it probably helps smooth airflow with or without a windscreen.
- 2014+ S models have a plastic enclosure for the headlamp that interferes with this.


- Parts
-
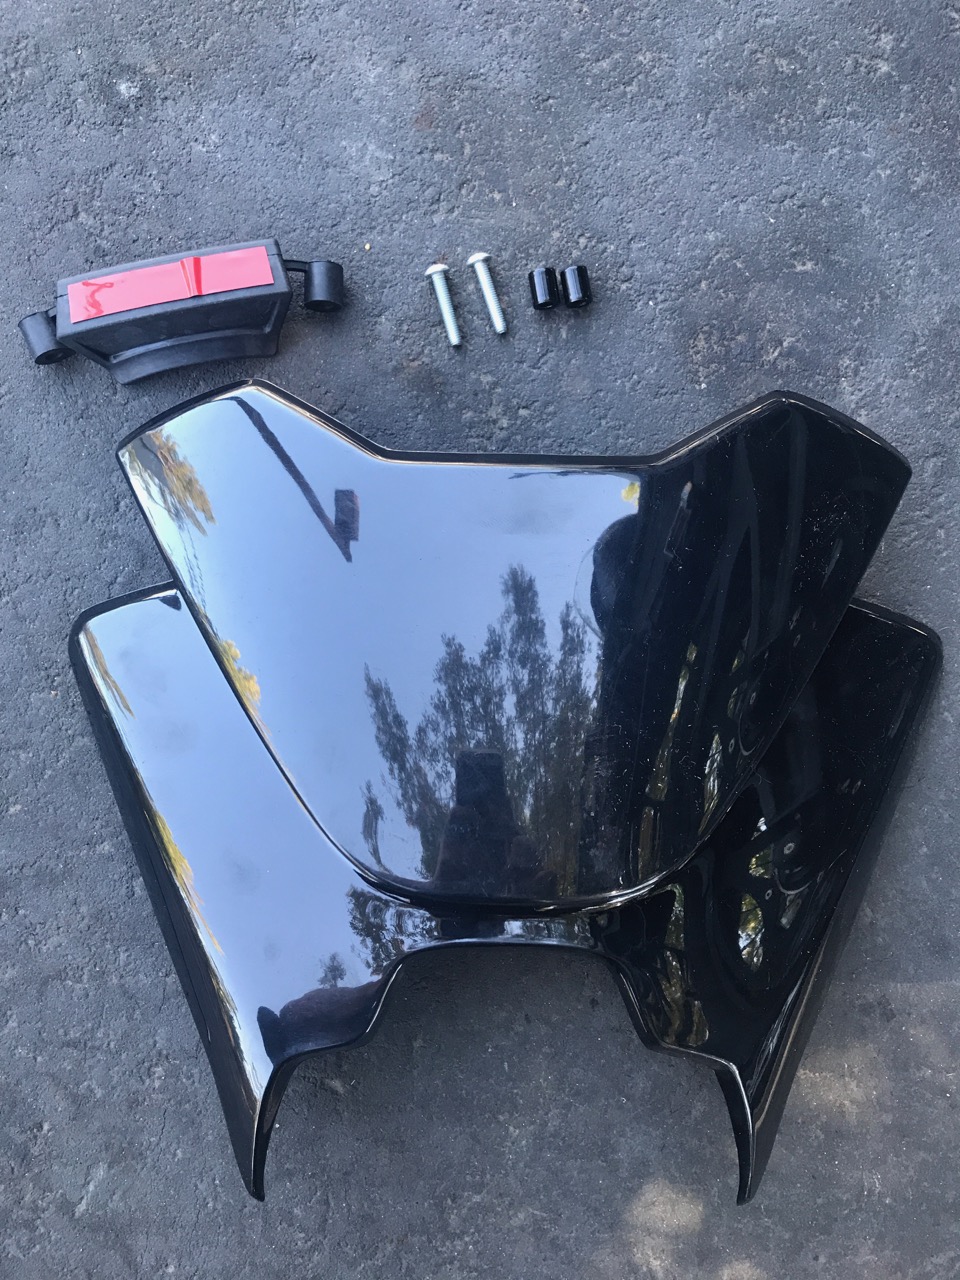

- Flyscreen
- Flyscreen rubber bumper with tape
- (2) spacers
- (2) M5⨉25 cap head bolts
- Tools
- 3mm Allen key
- Cutting tool (~scissors)
- Installation
- Remove the upper mounting screws for the headlight.
- Place the included bolts through the holes in the side of the flyscreen.
- Place the spacers onto the bolts on the inside of the flyscreen.
- Carefully place the flyscreen over the headlamp, matching the bolt position to the upper headlight mounting holes.
- The bolts must be withdrawn slightly to surround the headlight mount points.
- Engage the flyscreen mounting bolts to hold the flyscreen onto the headlight.
- Cut the rubber bumper's two side spacers off.
- Place the bumper against the top of the Koso gauge instrument cluster.
- Remove the tape along the top and press the flyscreen to it.
- Tighten the flyscreen mounting bolts.
Tank Grips
Tank grip pads are very useful for maintaining a crouched position comfortably and getting better control over the balance of the motorcycle.

- OEM
As of 2017, Zero offers soft TechSpec tank pads for 2013+ models on the S platform for $60:
- Third-Party
TechSpec makes many different shapes in a soft material. Some generic shapes are suitable for customizing (1200GS pads fit the DS tank with a little adjustment) with the right cutting tools.
Mudguard
OEM Rain Guard
This is a modest and inexpensive mudguard that mounts to the underside of the license plate tail extension.
- The Install page walks through installing it; pretty straightforward.
Universal Motorcycle Rear Fenderguard
- Recommendation with photos
- NOTE: This has been observed to fail when encountering any non-trivial debris, and could very dangerously dig into the rear tire.
- This mounts to the axle on the right side and adjustably extends over the rear upper quarter of the rear tire.
- It extends far enough to easily clear the DS tires.
- The bracket fits under the axle nut without compromising its fastening, although it does not snuggly conform to the axle diameter.
Fender Eliminator
SDS Fender Eliminator
- R&G Racing Tail Tidy fender eliminator
- Video Instructions
- Zero Motorcycle R&G Tail Tidy Install on Youtube:
FST Fender Eliminator
Corbin has created per-model fender eliminator kits for the SR/S and SR/F models.
Front Fender
Low Sport Fender Swap
- Goal
- Replace the high dual sport front fender with the low front fender from the sport models.
- Confirmed Fits
- The S/SR front fender bolts directly onto the FXS lower forks, for those interested.
- The DS/DSR/FX/FXS high dual sport front fender bolts directly onto the sport models, but this is not considered helpful.
- Adapter Brackets
- Cheap custom brackets will adapt the S/SR low front fender for the DS/DSR 19" wheel.
- The brackets arrange for an offset in the mounting holes so that the fender sits higher around the top of the larger wheel.
Fender Brace
The DS/DSR/FX/FXS models have a dual sport high fender which does flex a bit at speed.
- Some research indicates that the bolt pattern mounting the fender matches the Honda XR650L, allowing third-party fenders to replace it.
- Confirmed Fits
- JSN Engineering's fender braces.
- JSN Engineering also offers an auxilliary LED mount that uses the same attachment point.
- Steps
- The pattern is 4 holes in a rectangular shape 58mm (2.3in) wide and 50mm (1.95in) front to back (center to center).
- The bolts are M5x15mm button head socket screw for a 3mm Allen key.
- Remove the fender with a 3mm Allen key.
- Install the fender brace above the fender and replace the fender.
-
- Flex the fender to match the fender brace while keeping the mounting bolts in the fender to hold the brace the way it will be installed.
- Mark the fender where the holes for bracing align with the fender plastic.
- Remove the fender and drill holes matching the marks.
- Double check how the alignment should happen since flexing will cause it to differ.
- Replace the fender with the brace above it, and then fasten the fender to the brace.


- Trivia
- the S fork bracket has the same hole pattern as the DS, allowing it to mount hardware there.
Streamlining
A streamlined electric motorcycle could be extremely efficient and practical.
- Terry Hershner and Craig Vetter's Zero Streamliner proved that efficiency was possible by setting several records.
- This was done at a cost of altering the frame, considered impractical by many.
- Vetter has shown that his full teardrop reduces highway speed energy use by 50%.
- It is optimized for 70 MPH with a 30 MPH headwind.
Reducing drag by mounting fairings that reduce the overall wetted surface of the vehicle and distributing pressure over the surface of that body.
- See Also
- Wikipedia's Streamliner article for some history.
- Kammback describes the efficiency of a truncated teardrop, which is more stable in crosswinds.
- Motivation
- Context
- Loss of efficiency at speed is very high for a motorcycle and rider.
- Recharge rates for electric motorcycles will be roughly proportional to discharge rates at highway speeds for the near-term future.
- So, minimizing drag changes the ratio of time spent riding to charging, which makes a Zero more suitable for travel.
Vetter Streamlining
Craig Vetter has been working on eco travel options for motorcycles for decades.
- He recently got enthusiastic about electric motorcycle focus and helped Terry Hershner perform his streamlined cross-country trips, and has had a more conventional variant in the works for a couple of years.
- However, a recent riding accident has slowed or halted this progress.
- References
- Streamlining a Zero SR shows SR mockups with a proposed conventional-oriented design.
- Tail truncation
- Terry Hershner's 2012 project bike history
- more modifications shows some insight into how it's constructed.
- last record setting run in 2015 (300 miles on a charge!)
- Goals
- Vetter has three major goals for a streamline fairing which have tradeoffs against each other:
- Range
- Comfort
- Speed
- Availability
- The Vetter streamliner kit is available for sale for $2000 plus taxes and shipping.
- Parts
- The kit consists of fiberglass pieces made by molds held by Mike Corbin at his factory for:
- The forward nosecone in upper and lower halves.
- A "turret" piece made to rotate with the steering column.
- A "seatback" piece meant to smoothly re-attach turbulent air behind the rider's body onto the tail.
- They require a significant amount of fabrication, planning, and work to mount.
- All existing fitments are bespoke and unfit for even boutique level of adoption without major manufacturing commitment (a custom vehicle from the ground up).
- 2013+ S Platform Fitment
- A full 2013+ fitment for an S Platform Zero has not been proven, and would require significant discovery and iteration, or a drastic change in design priorities.
- Terry's streamliner Zero is a 2012 fitment that involved massive destructive modifications to the frame, and is essentially a retired experimental vehicle.
- The nosecone or front fairing would reasonably mount to an extension of the OEM crash bars along that plane in a forward diagonal arc.
- The seatback assumes destructive removal of the entire tail of the vehicle, completely repositioning the seat and controller to serve the purpose of the vision (minimizing frontal area).
- Since this operation would destroy the resale value of the vehicle and require significant shop expertise to carry out effectively, they are unsuitable for a kit.
Other Streamlining
Airtech Streamlining offers a number of fairings that are roughly suitable for various parts of the vision:
- Vintage Dustbin fairings
- These are smaller than the Vetter nosecone but lightweight and effective.
- The DBL1 seems most effective, and the DBL2 has been tried with some success.
- DBL1
- The parabolic or egg-shell shape is stronger and more aerodynamic.
- No cutouts are provided for the wheel or headlamp.
- The side profile is somewhat wider but the fairing admits some flex to change its aspect ratio.
- DBL2
- Wider, allowing more clearance around the 19" DS wheel and tire.
- Includes a basic cutout for the wheel, and a broad cutout for the headlamp.
- Side nacelles allow some air cooling to pass within the fairing.
- Low height limits its benefit to airflow without additional fabrication to close up the area around and behind the steering head.
- Square frontal profile reduces lean angle significantly without bringing the fairing too high for drag reduction.
- Vertical sidewalls are not as rigid, requiring reinforcement.
- Gilera / NSU / Agusta
- The Gilera is small and even lower than the DBL2, so not useful.
- The NSU and Agusta fairings are narrow but may prove useful for a bike with a sport-sized (17") front wheel.
- Vintage Full fairings
- These are good conventional fairings with a streamlining design.
- Wheel covers will still be quite helpful.
- All of these dump air straight onto a radiator area, but on a Zero this dumps air straight onto the front battery face, so they are somewhat compromised.
- Vintage Fairing Brackets
- These help for most of these fairings where pushing the headlamp forward from the steering column is required.
- Land Speed Record Fairings are for a GSX1300R Hyabusa, but probably can be fit to a Zero (TBD).